The Design Problem –
The problem I chose to solve was the lack of proper storage/organising space at the entrance of a house, where someone could put their keys and bags, and easily access them before leaving the house. I chose to fix this problem for my mother, as she was the one that had things to leave at the entrance, like her handbag, and her keys.
My client, Nicky Chardonnens:

My mother had been complaining about not having a place to put her bags, her keys and her sunglasses whenever she came home. She had to put her bag on the floor, as well as her keys and her sunglasses in her bag, and sometimes these things could get misplaced.
The Problem:

This problem, as well as its solution, has quite a large target market, as it applies to anyone that needs a place to hang their bags, and store their essentials in an organised manner.
The Design Goal
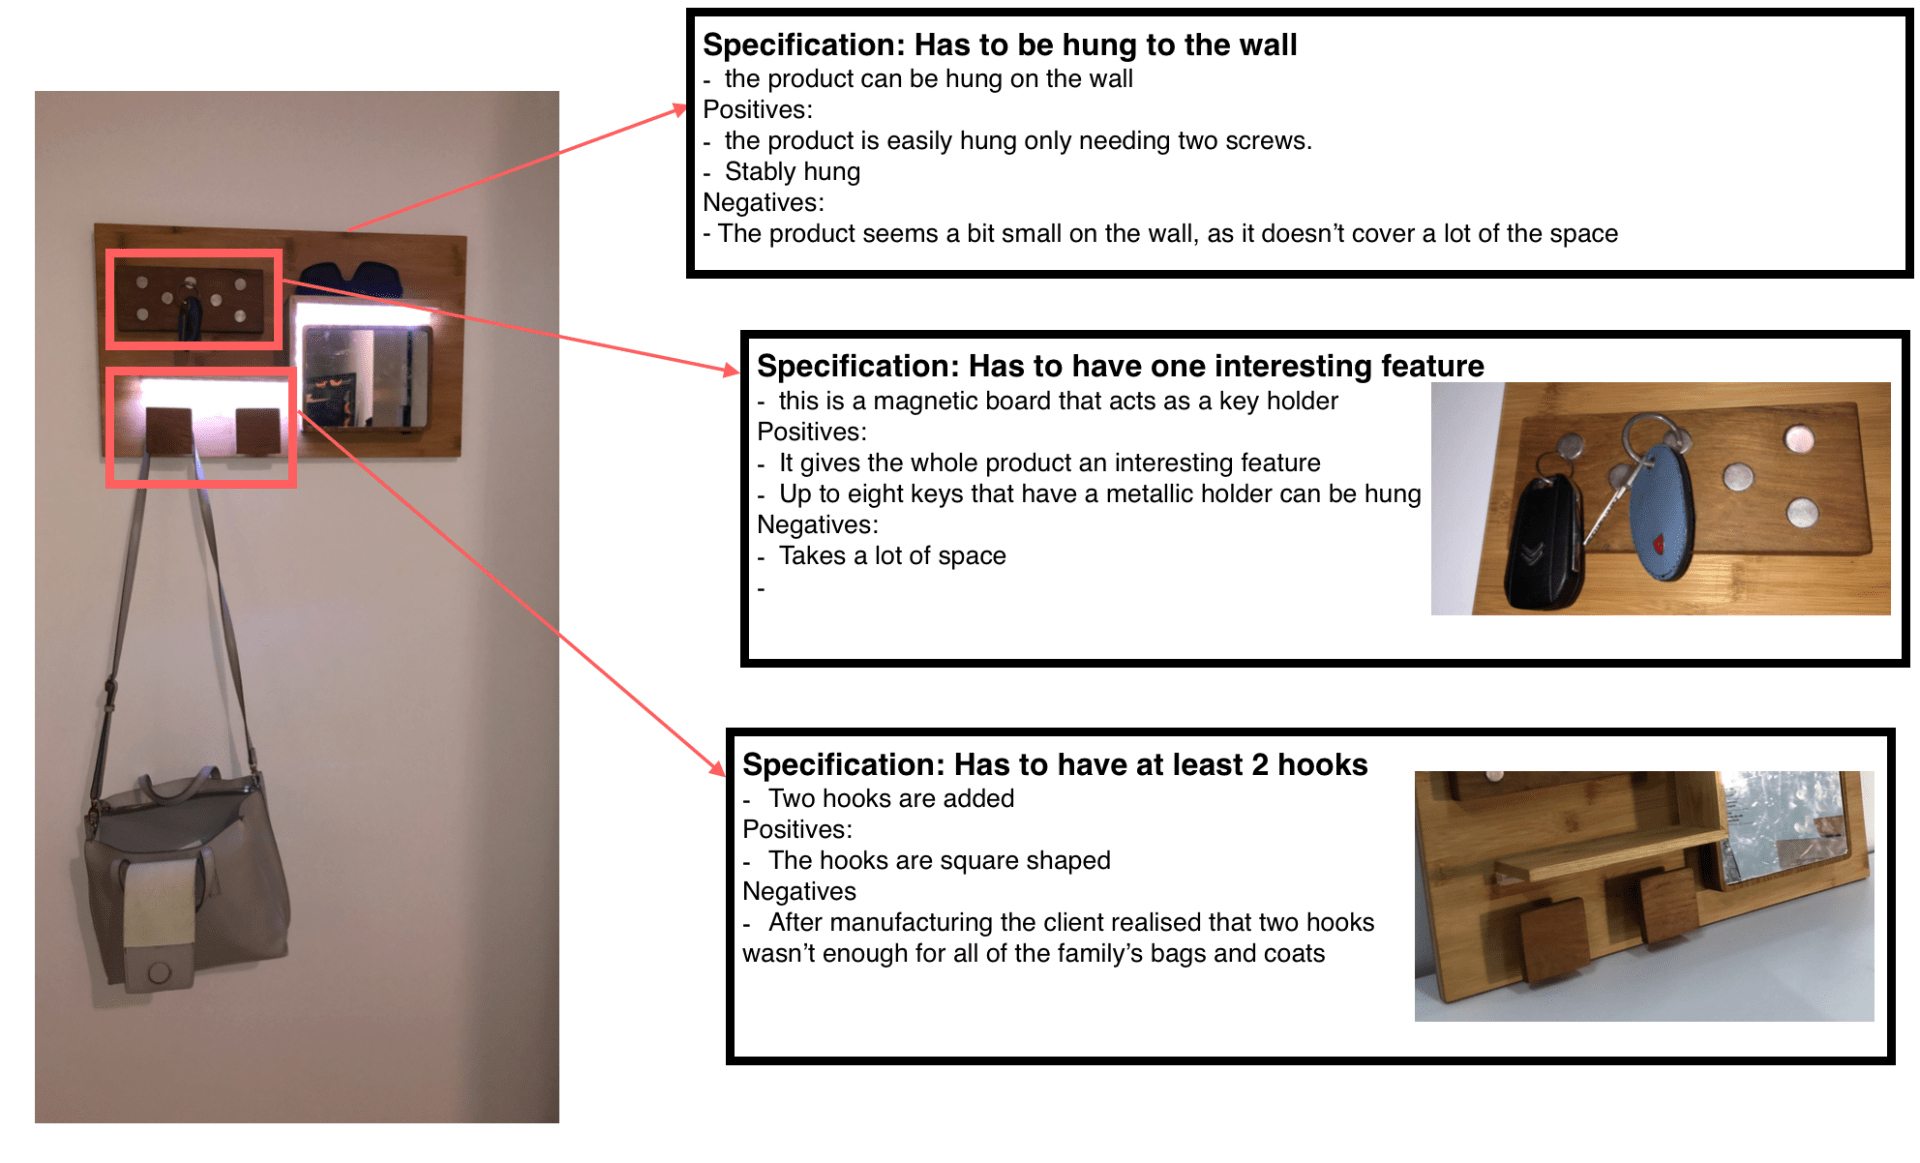
To solve this problem, I built an entrance organiser made out of bamboo wood, and teak. The main function of this organiser was to hang my mother’s bag off of the floor, and enable her to store things like her keys and her glasses within sight and reach so that she wouldn’t lose them. The product has two unique looking hooks, two shelves, a magnetic board to hang keys, and a mirror. There is also an acrylic case that covers an LED light strip, as the intended area for this product can get pretty dark.
Success Criteria
- The product preferably should be hung to the wall
- It needs to have space for at least one bag, one set of keys and a pair of sunglasses
- The product must be able to withstand the weight of each of these objects
- The colour scheme must fit the one of the intended environment – wooden colours, white
- The back of the product must have a system safe and strong enough to hold the entire product to the wall, and not fall
Creativity –
During the design process, I sketched and design a few possible ideas. I evaluated each of the designs on four areas; aesthetic/environmental, purpose/function, size and safety. Their ability to meet the desired criteria was judged using three colours; red means not met; orange means met, but could be better; green means expectation is met. I also evaluated their positives and their negatives. The sketched idea that met the most of the requirements would be the one I would manufacture, however, I would still be able to make slight changes to idea further on in the design and manufacturing process.
The ideas that I designed:


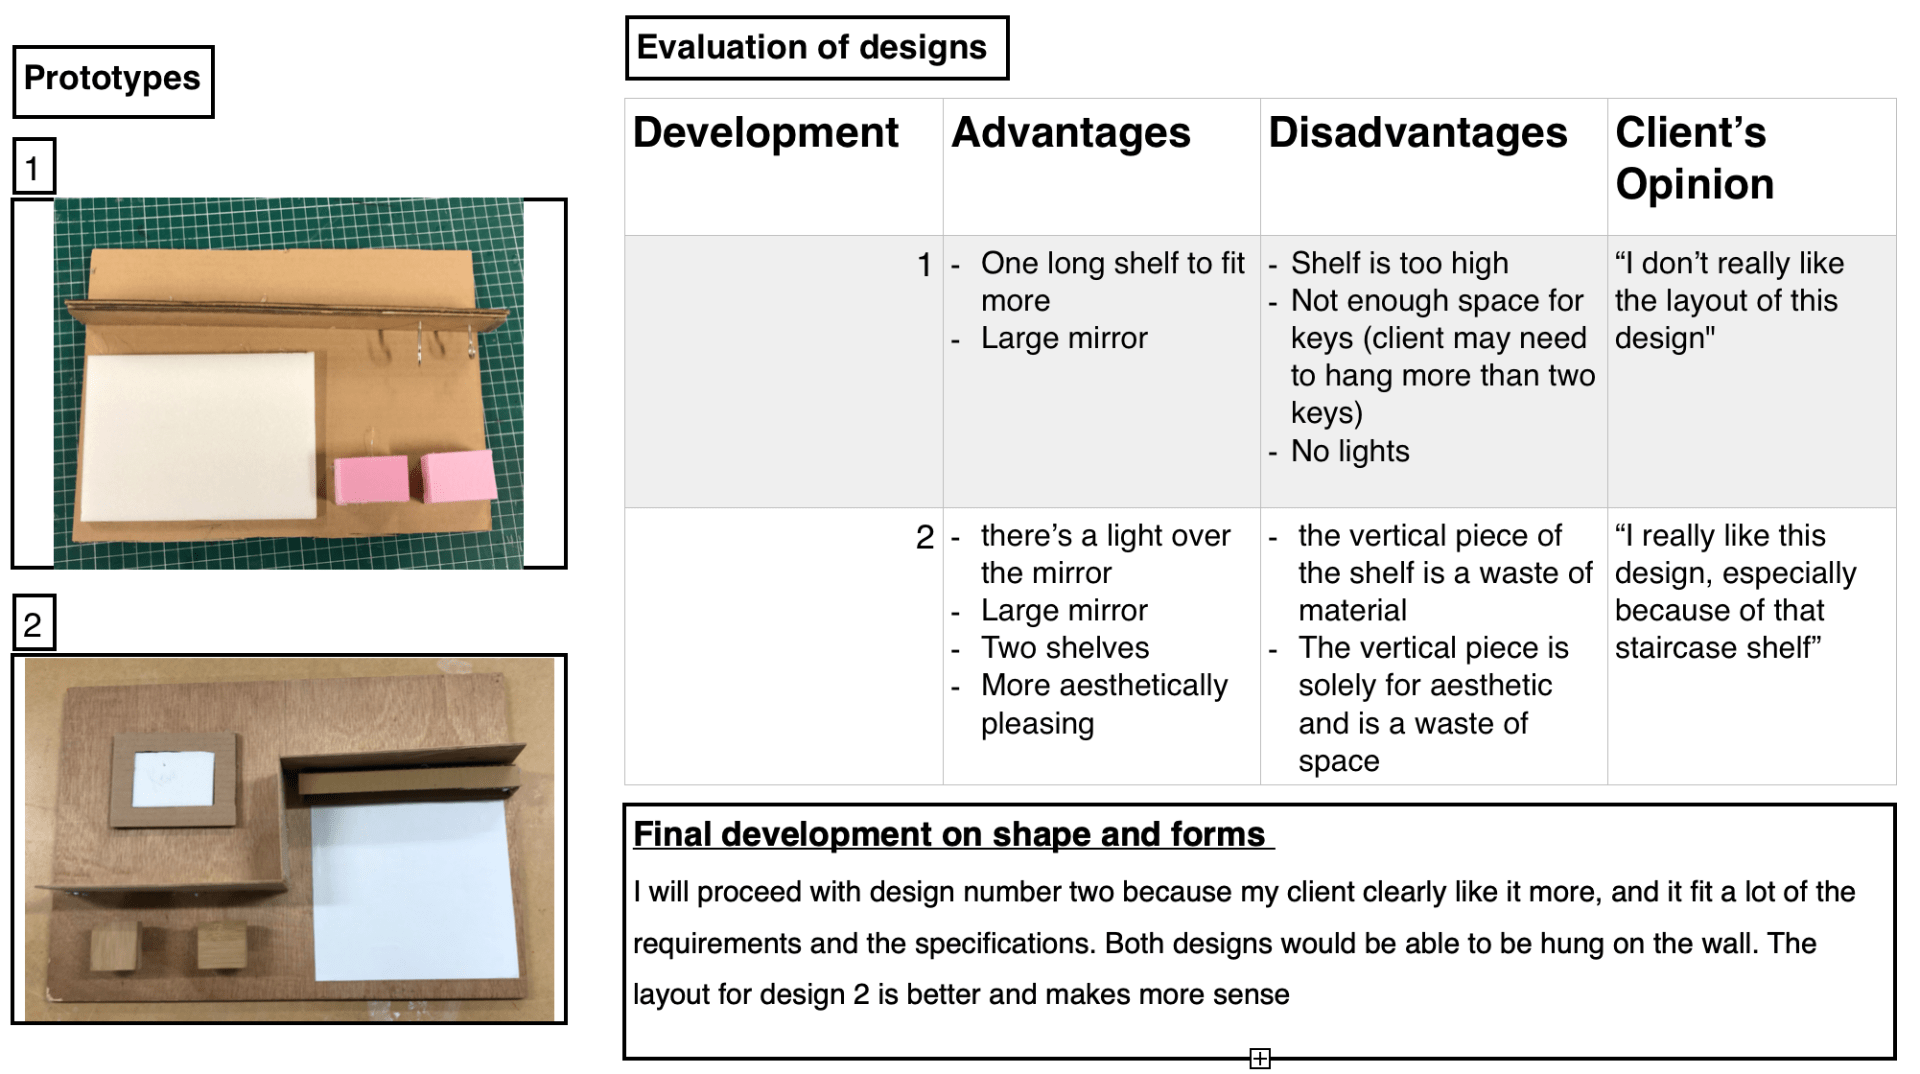
After evaluating each of these designs, I spoke to my client and interviewed her opinions for each of the designs. I recorded the outcome of the interview in a table which can be seen below. This table also includes a more thorough analysis of each idea to each of the criterion. The idea chosen by both myself and the client has been outlined in red. This idea was the client’s favourite, and found the placement of the shelves really well thought and aesthetically pleasing.
Innovation –
Innovation by design is the utilisation of a designer’s methods and sensibility to address the needs of the consumer. I couldn’t have been able to start the manufacturing of the product straight away. Before I began manufacturing the product for my client, I made two prototypes out of foam, cardboard and a scrap piece of wood. These prototypes allowed me to get a better idea of what the product could look like, and what changes I should make to improve the design. For both designs, I listed advantages and disadvantages, as well as asked for my client’s opinion, which I added in the table below:
For the next part of the process, I considered the different materials, and finishes. I looked at different types of woods and finishes and listed their advantages and disadvantages. This helped me decide which of them would be better to use for my final product, as well as which of them would meet my client’s needs. Below is the table in which I compared each of the woods and the finishes.

After considering, comparing, and analysing the woods and their finishes, I decided to use bamboo for the backboard in my product, and teak for the accessories. I decided to use teak oil as a finish. I could then move onto the next stage of my design process: planning for production
Planning for Production –
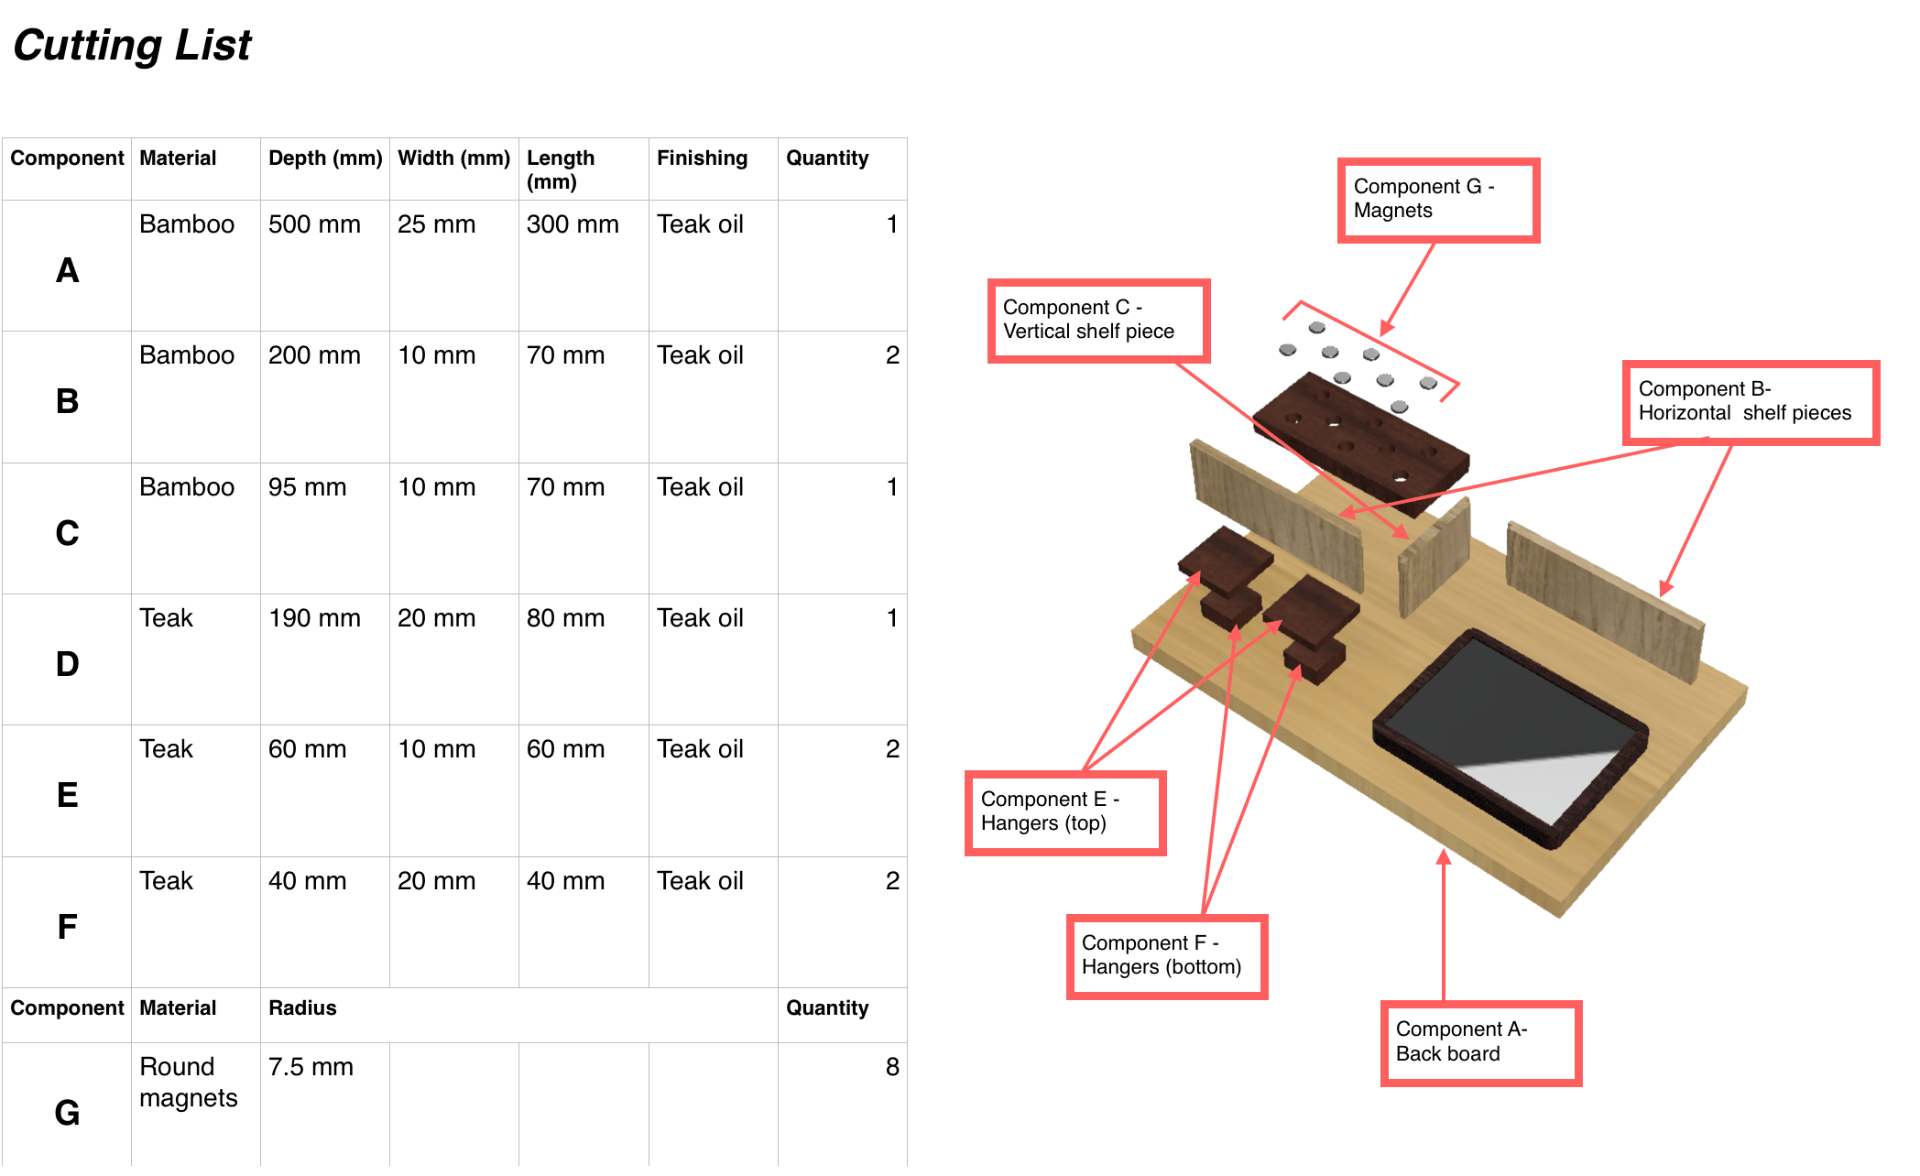
This stage of the Design Thinking Process is where I needed to be able to communicate the parts, assembly and technical details to a third party, using the correct type of drawing of the final proposal. This is essential, because that third party will be able to help me with providing me with the right materials, and help me with the manufacturing of the product. In order to make this clearly communicate the precise details of my product idea, I constructed my design in a digital CAD drawing using Fusion 360. Using the dimensions based on my prototype, I was able to create the digital drawing. Fusion 360 also allowed me to make an exploded view of my drawing to show the assembly of the product, as well as make an orthographic drawing to be able to communicate the precise dimensions of. With the exploded view of the product, I added a cutting list, and arrowed each component to it’s position on the product
CAD Drawing of my design:

Exploded view of my drawing:
Orthographic Drawing:

Realisation –
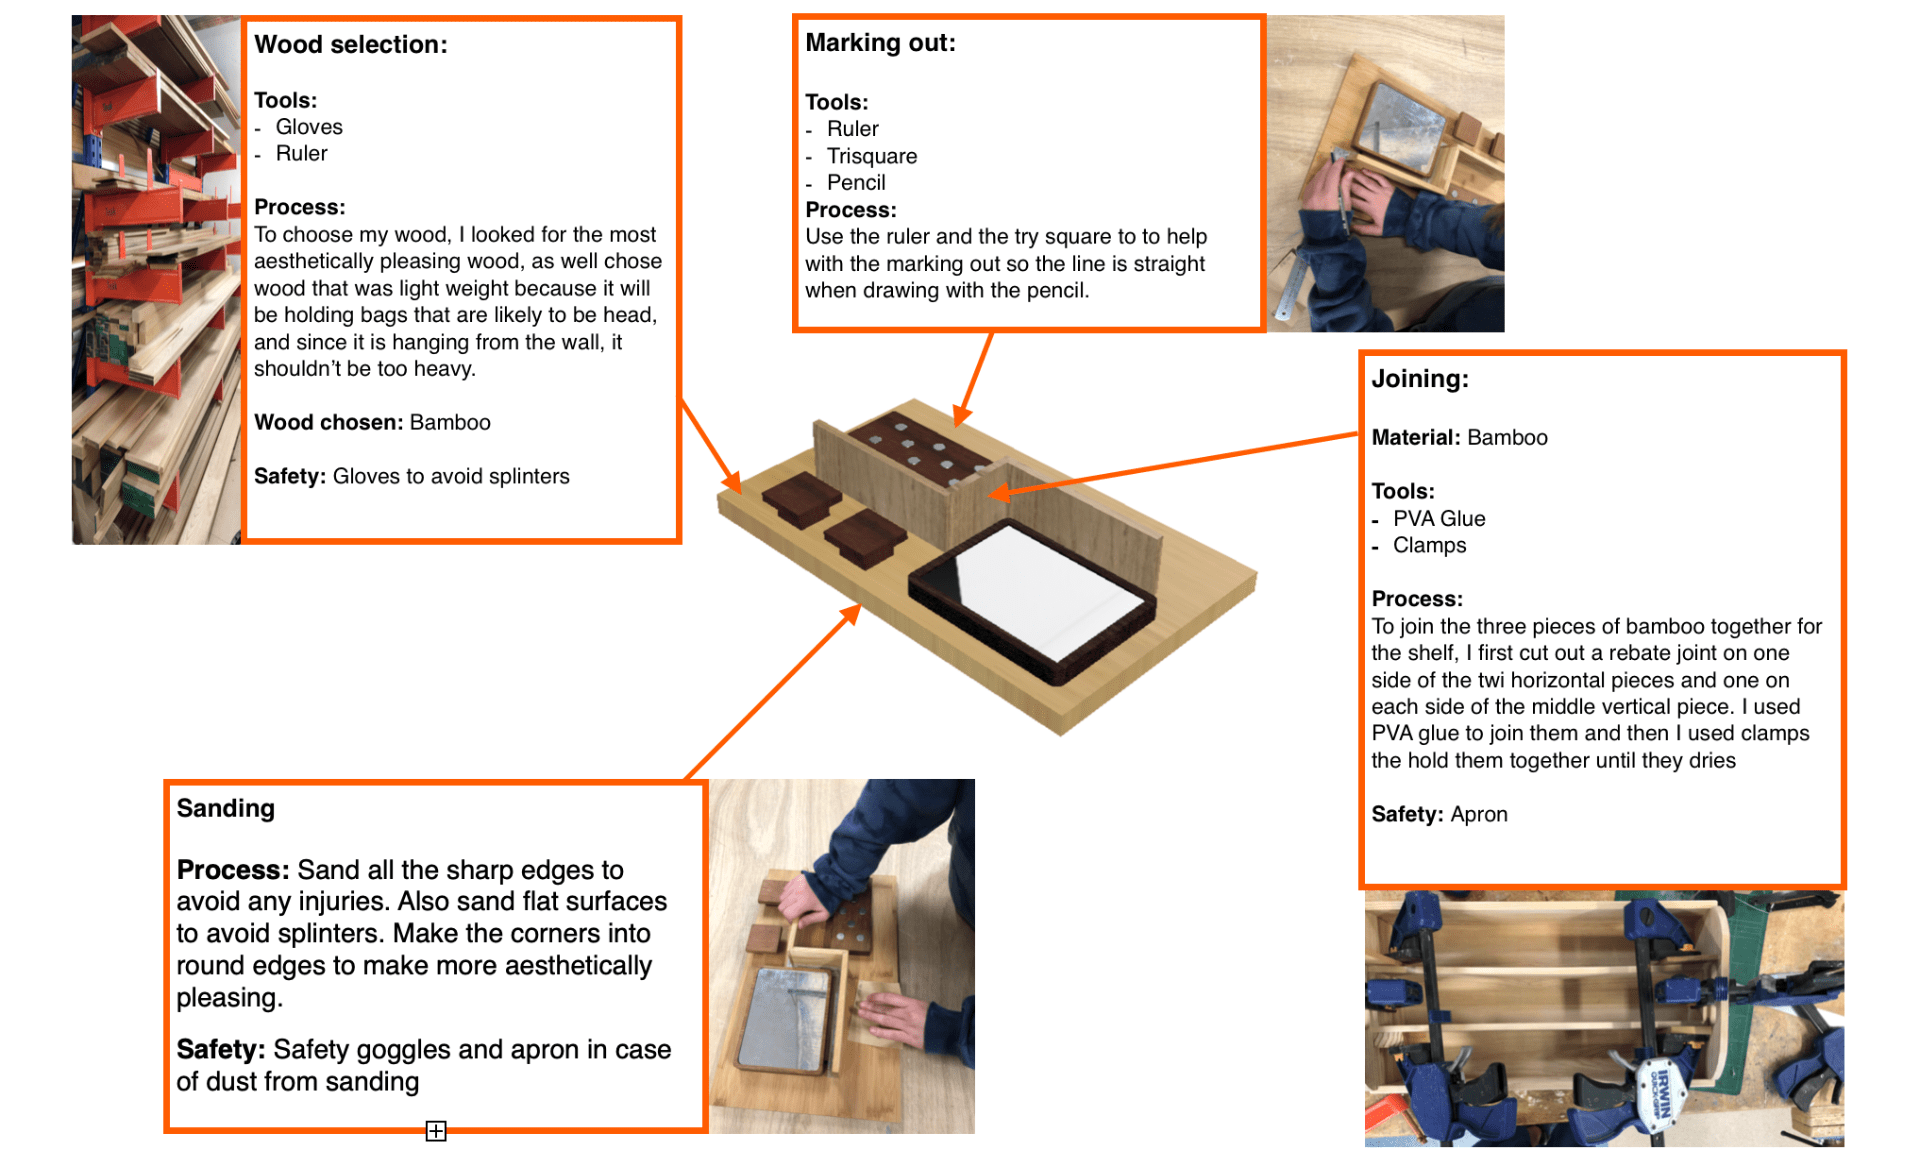
The next stage of the design thinking process was the manufacturing, and actually making the product. There are a number of processes included in the manufacturing process; wood selection; marking out; sanding; joining. I presented this process in a page including the tools used to carry out the processes I mentioned, a description of the process, the safety measures taken for each process, and a photograph for the process to further communicate it. This page is shown below:
Testing and Evaluation –
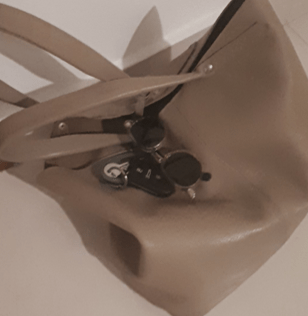
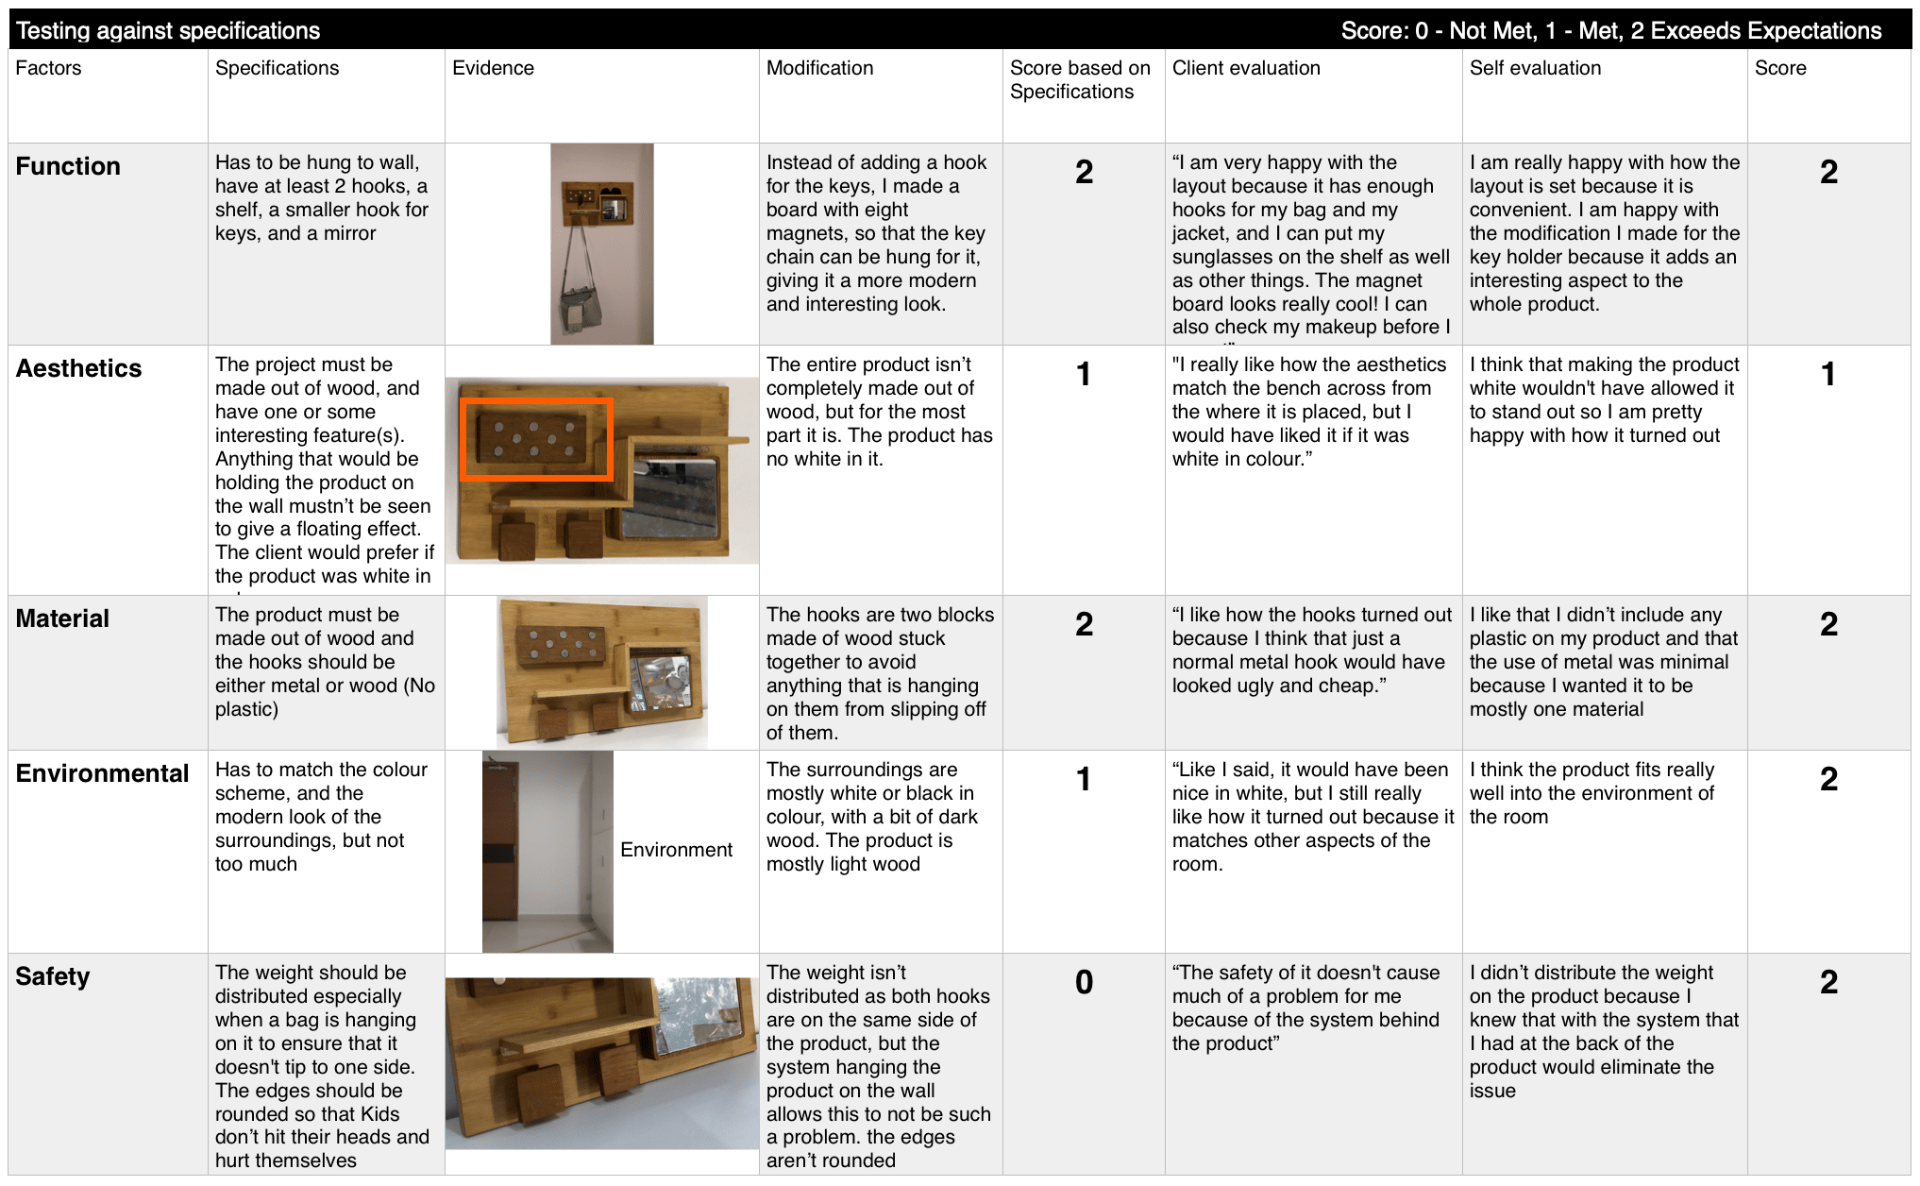
This process was important in order to ensure that the product met the client’s needs and wants, as well as ensuring it fits properly in the intended area, and the the function satisfied the client. Testing the product by putting it in the intended environment, allowed me to get an idea of how it looks, and what changes could be made to the appearance of the product, so that the client is completely satisfied. Seeing the product in its intended area allowed the client to give me feedback, and since my client lives with me, she was able to try out the product. The communication between the producer and the client is very important, and is even more effective when it is live and in person. I was able to evaluate the product against the specifications that I made at the beginning of the design process for this product. (Shown below)
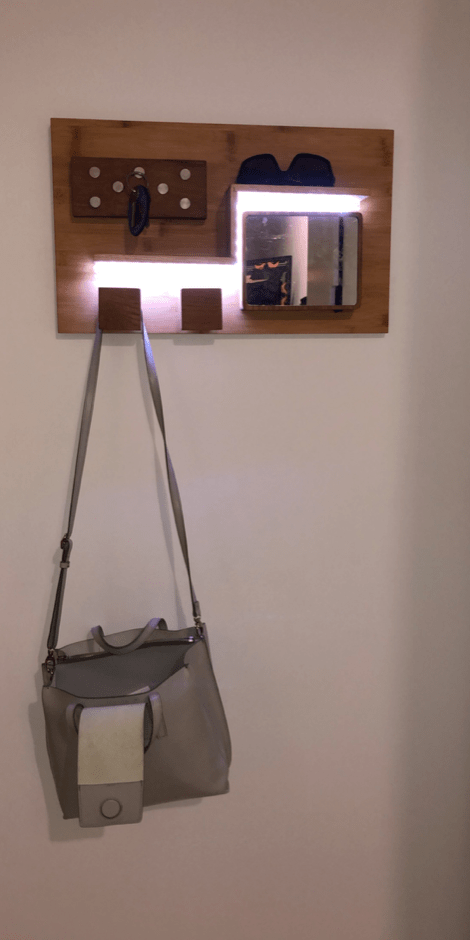
Product in its intended environment:
After testing and evaluating the product, I had a conversation with my client about the modifications that could be made to improve the overall function and aesthetic of the product. These modifications are shown below.

I am really pleased with my final product, and so is my client. The entire design process took nearly two years, and was a lot of hard work, and the end result was very rewarding. It taught me a lot, including problem solving, and how to add my creativity to the solutions of those problems. My mother now has an aesthetically pleasing, and organised place to put her bag, and essentials when she comes home, as well as they are easy to be retrieved every time she goes back outside.